... namely because I keep forgetting to take pictures. I feel like if I don't have pictures, I shouldn't be posting. I figure I should probably forego the pix now, and just do my normal "I'm going to post a glut of pictures at the end of each month when I remember to upload them" thing. :)
But, I'm going to tell you about my lessons in gauge in the last week.
I've recently put together a pattern I call "Shorty", because it's all short-rows. It's a hat, a pair of mittens, and a scarf, all done in short row garter stitch (okay, the scarf is done in garter, no short rows involved. Hm. That could be interesting, making a short-row scarf too, but I digress). I decided to make a set for my mother for Christmas, in Magellanes #302. Beautiful colorway, nice thick n thin yarn.
The hat was a breeze. The first mitten was almost a breeze (after improvising and then frogging and then re-doing it *reversed* of what I'd originally done for the thumb), but the second caused me issues. Same needles. Same yarn. Same "pattern" (or lack thereof) caused me to have a mitten that was two inches bigger than the previous one.
This did not make me happy.
So I frogged mitten number 2. I re-did it, much tighter than I had the previous attempt.
And I now had a mitten that was two inches smaller than the original.
This still did not make me happy.
Several attempts and re-frogging a few times over later, I finally got a mitten that is only slightly different from the original, close enough that I'm not going to fret.
This is definitely a lesson in "gauge counts".
On a different note, I cast on my first Entrelac swatch this last weekend, garter style. It was big enough that it took up a whole ball of yarn, but I finished it in only a few hours. I can either join the edges together and have a funky looking hat with points, or I can leave it as it is (I joined the sides) and have a funky looking ear-wrap. :) It was an experiement, because I didn't want to go experimenting with my Noro Aurora yarn on something I'd never done before.
So after the swatch went well enough, I decided to give a go at the real thing. I cast on with Noro Aurora, smaller needles, smaller squares, stockinette.
OMG, I'm in love. I *have* to take pictures of this, it's GORGEOUS.
Okay, I'll sign off now. At least now I can say I've said *something* here. :)
Monday, December 3, 2007
Friday, September 7, 2007
THEY'RE FINALLY DONE!!!
So, the Infinite Kilthose that I was so ardently talking about in July are finally finished!!!
Why do I call them the Infinite Kilthose? There's a few reasons.
1. If you look up the back, it looks like little infinity cables all the way up.
2. These socks took me friggin' forever. I started them in May, before we went on the anniversary vacation. These are the same socks I had to restart three times over.
3. Well, they're kilthose. For those who know what kilthose are, I don't need to explain. For anyone not in any way shape or form connected to Scotland (even by proxy through the renfaires or whatever other folk/re-enacting you do), kilthose are the socks that men wear with their kilts, they go up to the knee and fold over.
Most kilthose is quite honestly, boring. They tend to be plain old socks that happen to go to the knee and beyond. While it works with the kilt, it bored the hell out of me. When I asked the hubby if he'd like me to knit him anything, this was the answer. Hey, at least I know he'll wear them (as opposed to the dreaded "Sweater Curse" with most significant others).
So, we have, the Infinite Kilthose:


I haven't yet written up the pattern for them... I took some of the detailing from Knitty's Clessidra pattern, but then I went in a whole different direction with them... Instead of being a top-down pattern like Clessidra, I made these a toe-up. Instead of being a heel-flap, I did a short-row heel. Instead of doing a decreasing toe with a graft, I did a short-row toe starting with a crocheted provisional cast-on, and then just picking up the stitches on the bottom of the foot. Instead of just plain ribbing, I ribbed the cuff, but then I did inside-out cables so when you fold the top down, it looks "right". I didn't do seed stitch, I added more cables than the pattern asked for, and split one of the cable patterns in two so it became individual cables on the back instead of joined cables. I did the increases up the back instead of the decreases down the sides...
Well, to be honest with you, the only thing I took from the sock was the original cabling pattern, and then I kind of played with the whole thing. Since she was inspired to create the cabling pattern from Vogue Stitchionary Vol. 2, I don't feel like I've really copied so much as been inspired by Clessidra. But I really should ask her first before I try to publish this.
These socks took me three months to complete (with brief excursions into other projects like another pair of Fiber Trends Felted Clogs just because the cabling on these socks was driving me up a wall and I needed something easy to finish.
*whew*. I'm DONE!!!!!!!
I know I really should have posted the inbetween stages, and at some point I will. However, I had put all of the pictures on the camera in stages, and then couldn't find the firewire cable to offload them. And of course, there was a whole stage in there where I couldn't find the camera. Like when I was turning the heel, dammit. *chuckle*
So, at one point, I will give *some* detail. I plan on putting together an actual pattern at some point, I need to create some charts for the back side of the leg. But in the meantime, THE SOCKS ARE DONE!!!
Time to go wash and block when I get home so he can wear them this weekend!!! It's celtic weekend at the renfaire!
Why do I call them the Infinite Kilthose? There's a few reasons.
1. If you look up the back, it looks like little infinity cables all the way up.
2. These socks took me friggin' forever. I started them in May, before we went on the anniversary vacation. These are the same socks I had to restart three times over.
3. Well, they're kilthose. For those who know what kilthose are, I don't need to explain. For anyone not in any way shape or form connected to Scotland (even by proxy through the renfaires or whatever other folk/re-enacting you do), kilthose are the socks that men wear with their kilts, they go up to the knee and fold over.
Most kilthose is quite honestly, boring. They tend to be plain old socks that happen to go to the knee and beyond. While it works with the kilt, it bored the hell out of me. When I asked the hubby if he'd like me to knit him anything, this was the answer. Hey, at least I know he'll wear them (as opposed to the dreaded "Sweater Curse" with most significant others).
So, we have, the Infinite Kilthose:
I haven't yet written up the pattern for them... I took some of the detailing from Knitty's Clessidra pattern, but then I went in a whole different direction with them... Instead of being a top-down pattern like Clessidra, I made these a toe-up. Instead of being a heel-flap, I did a short-row heel. Instead of doing a decreasing toe with a graft, I did a short-row toe starting with a crocheted provisional cast-on, and then just picking up the stitches on the bottom of the foot. Instead of just plain ribbing, I ribbed the cuff, but then I did inside-out cables so when you fold the top down, it looks "right". I didn't do seed stitch, I added more cables than the pattern asked for, and split one of the cable patterns in two so it became individual cables on the back instead of joined cables. I did the increases up the back instead of the decreases down the sides...
Well, to be honest with you, the only thing I took from the sock was the original cabling pattern, and then I kind of played with the whole thing. Since she was inspired to create the cabling pattern from Vogue Stitchionary Vol. 2, I don't feel like I've really copied so much as been inspired by Clessidra. But I really should ask her first before I try to publish this.
These socks took me three months to complete (with brief excursions into other projects like another pair of Fiber Trends Felted Clogs just because the cabling on these socks was driving me up a wall and I needed something easy to finish.
*whew*. I'm DONE!!!!!!!
I know I really should have posted the inbetween stages, and at some point I will. However, I had put all of the pictures on the camera in stages, and then couldn't find the firewire cable to offload them. And of course, there was a whole stage in there where I couldn't find the camera. Like when I was turning the heel, dammit. *chuckle*
So, at one point, I will give *some* detail. I plan on putting together an actual pattern at some point, I need to create some charts for the back side of the leg. But in the meantime, THE SOCKS ARE DONE!!!
Time to go wash and block when I get home so he can wear them this weekend!!! It's celtic weekend at the renfaire!
Tuesday, July 17, 2007
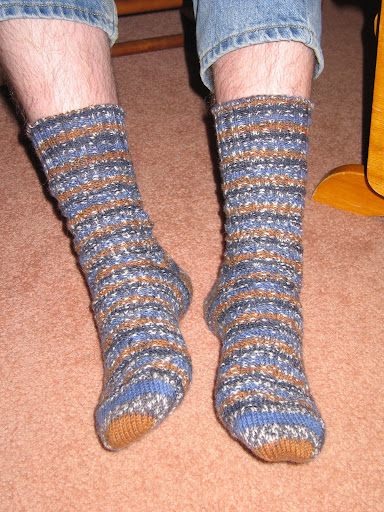
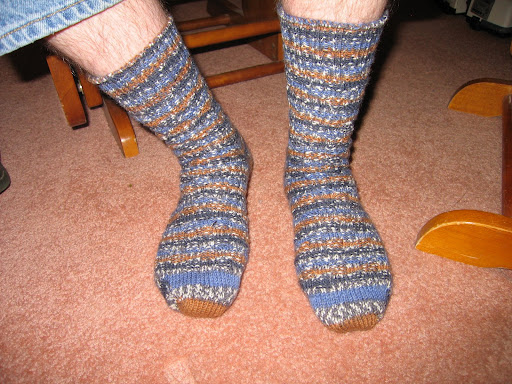
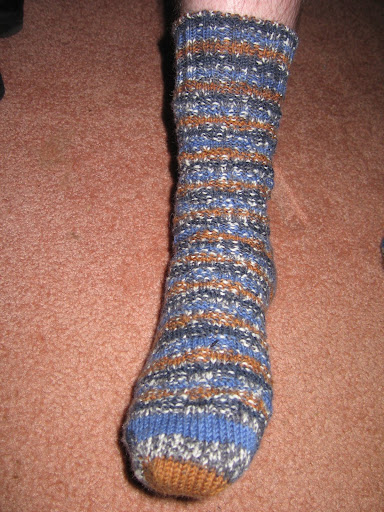
My own socks

Yarn: Lion Brand Magic Stripes, brown/blue pattern
Pattern: My own basic generic sock pattern, loosely based on Knitty's Universal sock pattern.
Needles: Size 3 dpn
I did these as a toe-up pattern, cast on 32 stitches with a provisional cast-on, then did the toe as a short-row toe. When the toe was completed, I continued working in the round, K4,P4, for four rows, then switched to P4, K4 for four rows. I alternated between K4P4 and P4K4 every four rows until I reached the proper length for my husband's foot, then did a short-row heel (as per the knitty pattern), then resumed the K4P4/P4K4 alternation every four rows, for 60 rounds. Then I did a K2P2 rib for twenty rounds, bound off with a circular bind-off.
Monday, July 16, 2007
Not-So-Fair-Isle socks
It's been a while since I made these, but I never actually posted them... They were my first socks ever... Let me recommend to anyone else out there who is beginning on socks, don't start out on these. ;)
Yarn: Knit Picks Essentials in brown, and Knit Picks Essential Stripes in "Sunny Day" colorway (I think, I don't remember the exact colorway name, and it's no longer on the website).
Needles: Size 4 dpn.
Pattern: Knit Picks Not-So-Fair-Isle socks (also no longer on website, since they no longer have the essential stripes)
Okay, for never having done socks before, I don't think I did too badly... This is a fair isle type pattern, done with two different yarns (I had also never done fair isle before, go fig). It's a top-down pattern with a short-row heel and six even decreases for the toe. It took me a little while to get my tension right for the fair isle (some parts are tighter than others), but it wasn't too bad, they at least fit! :) Also, there's a hole on both socks where the short-row heel starts... I'm starting to figure out how to get rid of that problem, I'm about three pairs of socks later nowadays.
Because it's self-striping sock yarn for the carry yarn, it made for some really nice pattern and color changes without having to change the yarn! I still haven't figured out the jogless join, so the backs of these socks are a little funky right at the change in pattern, but all in all, I can't say they turned out too badly!


Not too bad... Although wearing them over the summer is something I'd rather not try, they're kind of thick, being two strands of superwash wool.
Because of the pattern, and the way the fair isle was being stretched in the bottom half of the sock, this sock actually gives kick-ass arch support! :)
Yarn: Knit Picks Essentials in brown, and Knit Picks Essential Stripes in "Sunny Day" colorway (I think, I don't remember the exact colorway name, and it's no longer on the website).
Needles: Size 4 dpn.
Pattern: Knit Picks Not-So-Fair-Isle socks (also no longer on website, since they no longer have the essential stripes)
Okay, for never having done socks before, I don't think I did too badly... This is a fair isle type pattern, done with two different yarns (I had also never done fair isle before, go fig). It's a top-down pattern with a short-row heel and six even decreases for the toe. It took me a little while to get my tension right for the fair isle (some parts are tighter than others), but it wasn't too bad, they at least fit! :) Also, there's a hole on both socks where the short-row heel starts... I'm starting to figure out how to get rid of that problem, I'm about three pairs of socks later nowadays.
Because it's self-striping sock yarn for the carry yarn, it made for some really nice pattern and color changes without having to change the yarn! I still haven't figured out the jogless join, so the backs of these socks are a little funky right at the change in pattern, but all in all, I can't say they turned out too badly!
Not too bad... Although wearing them over the summer is something I'd rather not try, they're kind of thick, being two strands of superwash wool.
Because of the pattern, and the way the fair isle was being stretched in the bottom half of the sock, this sock actually gives kick-ass arch support! :)
Friday, July 13, 2007
Fiber Trends Felted Clogs
Fiber Trends Felted Clogs are a quick and easy knit... You can easily make a pair in a few hours, not including drying time. Give yourself a weekend. I used Lamb's Pride Worsted Wool in Raspberry and Deep Charcoal, two stranded.
Stitch types you need to know are your basic knit and perl, plus SSK and K2tog. They'll show you how to make a stitch (m1). When they tell you to make a stitch, it's not your standard increase by stitching twice in the same loop, they have you effectively pick up from inbetween stitches.
Okay, so I don't have pix of the ones I did recently... But I do have pix of the ones I made a few months ago.
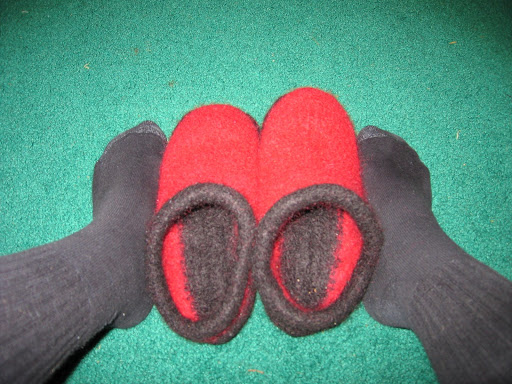
This seems like an odd pattern, because what you wind up with is this HUGE shoe:
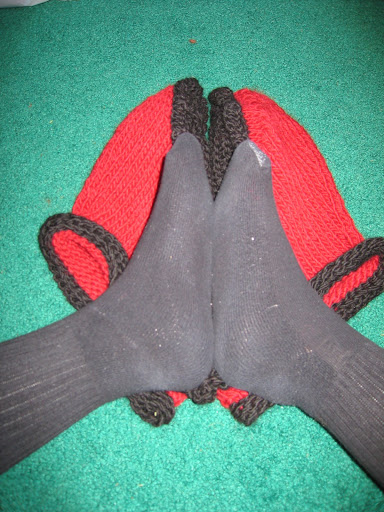
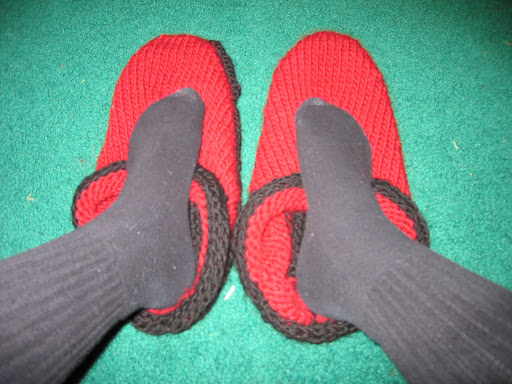
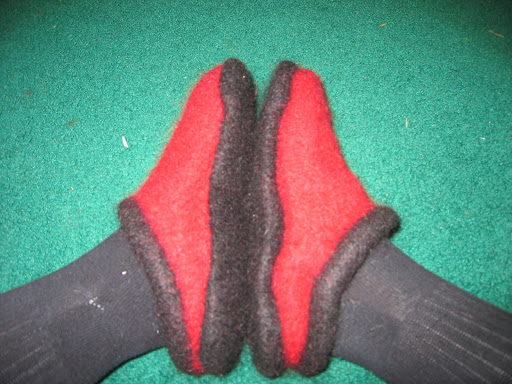
However, when you're done? The results are *just right*. Throw these puppies in the wash on hot for a few minutes, and it's like a shrinky dink!
Things I learned in doing the second pair:
1. If you use smaller needles, the length will still be the same, but the width will be narrower. So if you've got narrow feet, use a size 11 needle instead of a size 13 (this was done in a fit of desperation... I could *NOT* find my size 13 Addi Turbos, so I had to make do with a size 11 Susan Bates. Since my first pair was slightly large, I figured there was no harm done to use a different sized needle. All it did was shrink the width, not the length).
2. SWATCH FIRST. Just because Lamb's Pride felts at one rate does not mean the equivalent Patons wool will felt at the same rate. If you're doing two-color, make a two-color swatch. My first pair wound up being just a bit large.
3. These are incredibly comfortable, but you need to wear them while still wet in order to get them to mold properly to your foot. If these are a gift for someone else, tell them to throw them in the wash first (INSIDE A PILLOWCASE, so they don't make a mess of their machine), take them out while still wet, and mold to the feet from there.
4. You *CAN* let them spin dry, but only if you're *at* the washing machine at the time they start to spin... If you can position them so the soles are facing the outside of the machine, the washing machine will do the rest and take out most of the water, so you have less drying time. If you let them spin dry without positioning them first, they may fold over and you will get funky bumps in the soles of your new clogs.
5. DO NOT FORGET TO USE A PILLOWCASE. I cannot emphasize this enough. While the Patons yarn I used the second time didn't shed as much as the Lamb's Pride did, it still left a mess all over the pillowcase. If you don't use a pillowcase, you will have yarn fuzzies wrapped around the inside housing of the washing machine, and after a few times of doing this, you'll have to buy yourself a new machine.
These were a nice, quick, easy knit. If you're a beginner looking for something other than washcloths, these are a nice alternative. They're easier and MUCH faster than socks, but they start to give you the idea of what shaping can do.
Happy Knitting!
Stitch types you need to know are your basic knit and perl, plus SSK and K2tog. They'll show you how to make a stitch (m1). When they tell you to make a stitch, it's not your standard increase by stitching twice in the same loop, they have you effectively pick up from inbetween stitches.
Okay, so I don't have pix of the ones I did recently... But I do have pix of the ones I made a few months ago.
This seems like an odd pattern, because what you wind up with is this HUGE shoe:
However, when you're done? The results are *just right*. Throw these puppies in the wash on hot for a few minutes, and it's like a shrinky dink!
Things I learned in doing the second pair:
1. If you use smaller needles, the length will still be the same, but the width will be narrower. So if you've got narrow feet, use a size 11 needle instead of a size 13 (this was done in a fit of desperation... I could *NOT* find my size 13 Addi Turbos, so I had to make do with a size 11 Susan Bates. Since my first pair was slightly large, I figured there was no harm done to use a different sized needle. All it did was shrink the width, not the length).
2. SWATCH FIRST. Just because Lamb's Pride felts at one rate does not mean the equivalent Patons wool will felt at the same rate. If you're doing two-color, make a two-color swatch. My first pair wound up being just a bit large.
3. These are incredibly comfortable, but you need to wear them while still wet in order to get them to mold properly to your foot. If these are a gift for someone else, tell them to throw them in the wash first (INSIDE A PILLOWCASE, so they don't make a mess of their machine), take them out while still wet, and mold to the feet from there.
4. You *CAN* let them spin dry, but only if you're *at* the washing machine at the time they start to spin... If you can position them so the soles are facing the outside of the machine, the washing machine will do the rest and take out most of the water, so you have less drying time. If you let them spin dry without positioning them first, they may fold over and you will get funky bumps in the soles of your new clogs.
5. DO NOT FORGET TO USE A PILLOWCASE. I cannot emphasize this enough. While the Patons yarn I used the second time didn't shed as much as the Lamb's Pride did, it still left a mess all over the pillowcase. If you don't use a pillowcase, you will have yarn fuzzies wrapped around the inside housing of the washing machine, and after a few times of doing this, you'll have to buy yourself a new machine.
These were a nice, quick, easy knit. If you're a beginner looking for something other than washcloths, these are a nice alternative. They're easier and MUCH faster than socks, but they start to give you the idea of what shaping can do.
Happy Knitting!
Thursday, July 12, 2007
The project that never ends...
So, as I said before, I'm working on a set of kilthose for the husband. I'm about halfway up the calf on the first one. It's a combination of Knitty's Clessidra and John Anderson Kilt Hose. If I could remember to bring my camera with me when I take a picture of my hubby's foot trying it on, I'd let you see it. ;)
Thing is, it's taking forever. I've already had to stop and make a pair of Fiber Trends Felted Clogs because I needed to take a break from these socks. Unfortunately, I do not have a picture of those, since I promptly gave them to my mother-in-law as a present.
I was in Disneyworld in May when I started them. Got all the way to the heel before realizing that it wasn't going to fit my husband... It was just fine until putting the heel on, and that constricted it enough to keep it from slipping over his foot. So I had to unravel the whole thing and start over again.
Then, I started with the right width, but about halfway up the foot, I realized I'd screwed up ON THE FIRST CABLE, and done it in the wrong direction. *sigh* Frogged almost the entire thing, just left the toe unfrogged.
This will teach me not to do this when on line at Disneyworld and being distracted enough to forget where I am when I'm cabling.
So now I'm actually halfway up the calf. This is good. However, it's getting frustrating. I used to take the bus to work, so I had plenty of time to knit each day. Now I drive, new job. So I'm only getting a couple of minutes here or there to work on it. I've only gone about an inch in the last week. At the rate I'm going, it'll be next year before I finish the first sock, let alone the second.
And of course, working on tiny needles and doing all of that cabling, I'm getting mighty frustrated mighty fast.
*sigh*
I'm going to a wedding this weekend. I think I'm going to take that sock with me on the plane and see what I can get done (not that I wasn't planning on doing this anyway). But I may have to put it down for a while and do something fast just so I can get the "completed object giddies" out of my system.
Wednesday, June 27, 2007
Thneeds...
For those who remember Dr. Seuss, a Thneed is a Thing you Need... :) Thneeds can be a scarf, a shawl, a hood, a muff, a giant pocket/purse, and any other number of a combination of things you need at the moment... I've even put one on like a tube dress. It's effectively very similar to the Magic Scarf, only a bit more flexible in its uses. Instead of being a skinny tube like the Magic scarf, it's a much wider tube, allowing for a number of different ways it can be worn.
Thneed pattern:
Needles: US Size 17 circular
Yarn: Lion Brand Fancy Fur or other combination of eyelash yarn with another yarn, such as Sensations Sprinkles and Moda Dea Jai Alai. Typically uses 4 balls, although more or less can be used as desired.
Gauge: BIG. Trust me when I say that gauge on this project is not an issue.
Time: Depends upon how fast you knit, but one can easily be done in a weekend.
Using a stretchy cast-on, cast on 80 stitches. Join, and knit in the round until you almost run out of yarn. Bind off using a stretchy bind-off. See, wasn't that easy?
Just a start...
... So, I've never done a blog explicitly for crafts before... I'm a big-time crafter with anything having to do with string. As a child, I made string bracelets and lanyards... Now, I knit, crochet, cardweave, sew, basically anything you can do with string.
As time goes by, I'll start posting more regularly, but for right now, I've got three projects on the needle: Kilthose (my own pattern), a thneed (also my own pattern), and a pair of Fiber Trends Felted Clogs... I've done that last pattern before, as well as the thneed pattern (although that one's easy enough that a pure beginner could do it)... the kilthose pattern is based on the Clessidra pattern from Knitty.com, only it's just borrowing the basic stitches that were borrowed from Vogue knitting anyway. :) It's a pair of toe-up knee-socks (as opposed to the top-down that Clessidra is), with lots of cabling. Instead of having the increases on the sides, I have the increases going up the back. Oh, and I'm doing it as a short-row heel and short-row toe. Okay, so it's really my own pattern, I guess, just based upon the stitch charts on the page. I keep having to put it down, because after a while your eyes begin to bleed... Too many cables! The things I do for my husband... :)
So, that's all for now. I'll start putting things in as I begin to take pictures...
Subscribe to:
Posts (Atom)